こんにちは、マーケターの中野です。
microCMSに登録してあるコンテンツを、ユーザーごとに出し分けて表示したいと思ったことはありませんか?
今回は、HubSpotで取得したユーザーのプロパティ(性別や居住地域など)をもとに、「あなたにおすすめのコンテンツ」を表示する方法をご紹介します。本記事ではHubSpotを例に解説しますが、他のCRMにおいても、ユーザー情報を取得するためのAPIが提供されていれば、同様の実装は可能です。
はじめに
この記事では、HubSpotにユーザーの「性別」と「居住地域」が登録されていることを前提としています。
これらの情報は、たとえばお問い合わせフォームや資料請求フォームなどを通じて、ユーザーから入力されたものが自動でHubSpotのコンタクト情報に保存されている想定です。
性別・居住地域は、HubSpotの「コンタクトプロパティー」にてあらかじめ作成・設定しておく必要があります。今回は、以下のような構成になっています:
プロパティ名
gender, residence_area(任意のAPI内部名)
フィールドタイプ
ドロップダウン選択
選択肢の例:
- gender: 女性(
female)、男性(male)、その他(other)など - residence_area: 関東(
kanto)、中部(chubu)、関西(kansai)など
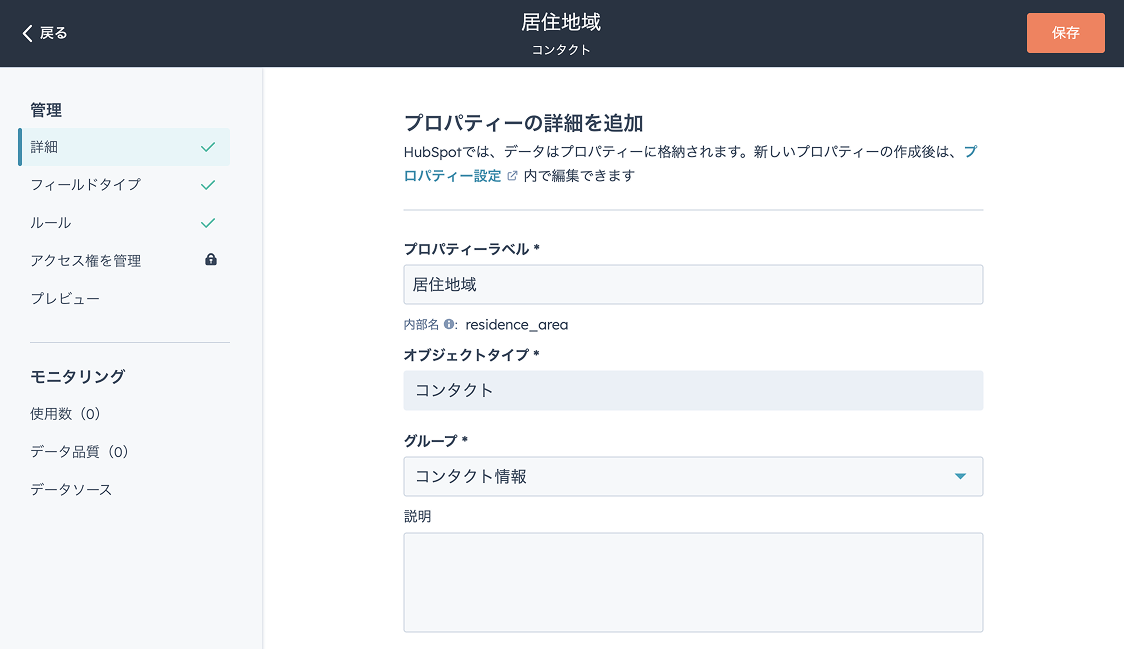
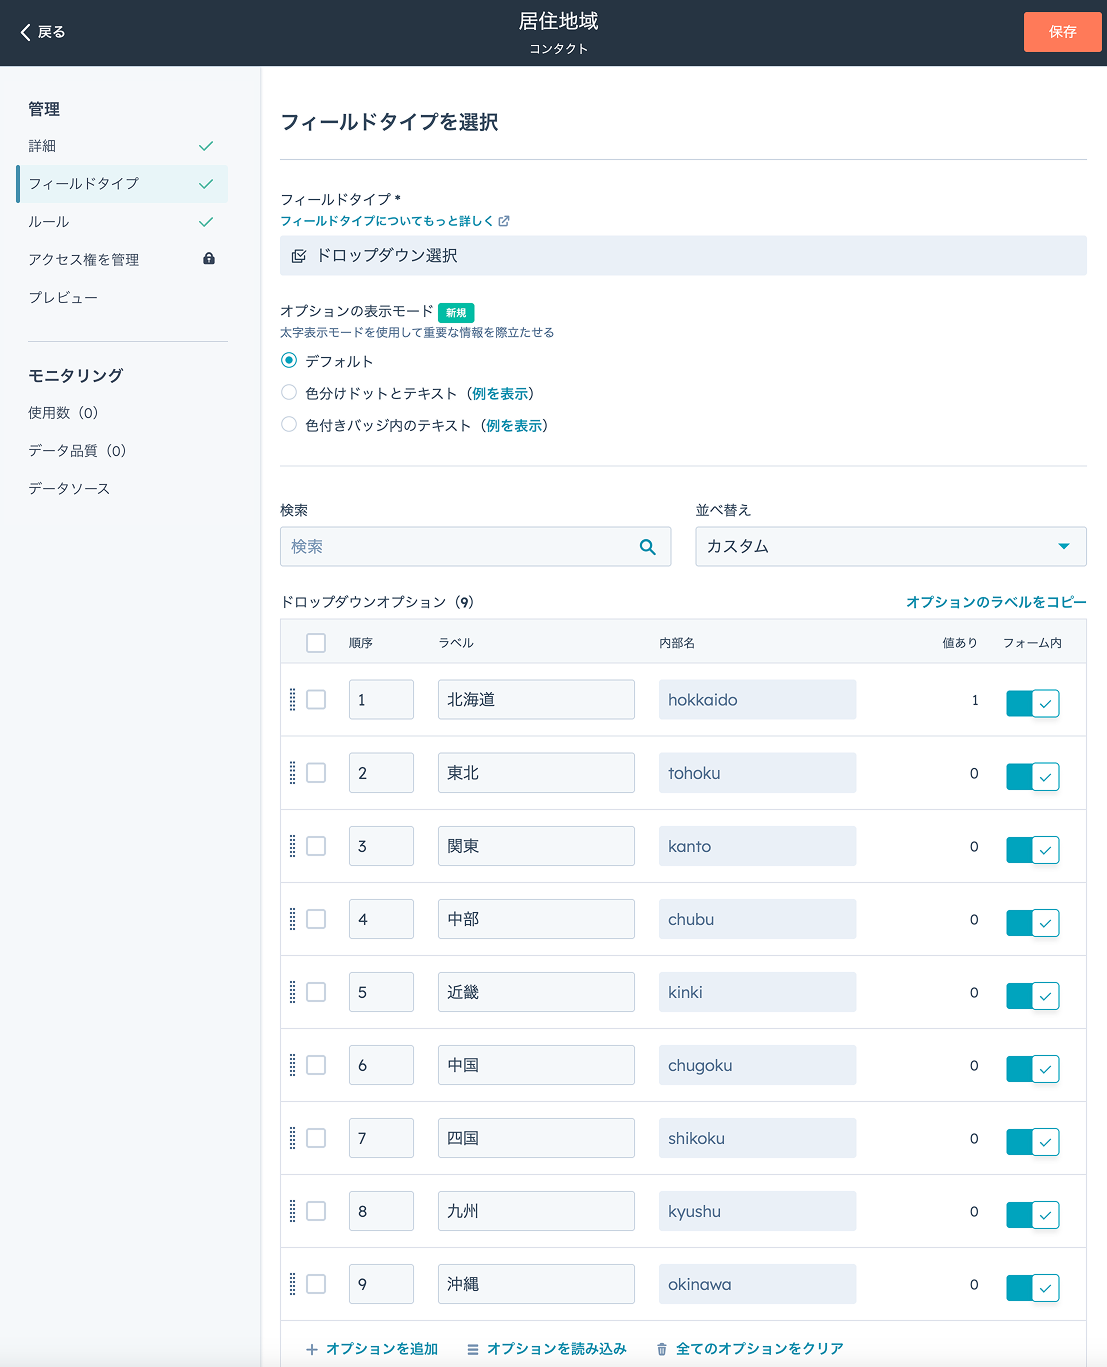
ラベル名は日本語で問題ありませんが、内部名は英語のID形式(例:female, kantoなど)にしておくと、後続の実装(microCMSでのフィルタやIDマッチ)と連携しやすくなります。
このように、事前にHubSpot側でプロパティ設定と選択肢の整備が行われていることが、今回の実装の出発点になります。
手順
1. HubSpotで非公開アプリを作成
ヘッダーにある歯車アイコン(設定)をクリックし(①)、サイドメニュー「連携」にある「非公開アプリ」を開き(②)、[非公開アプリを作成]ボタンをクリックします(③)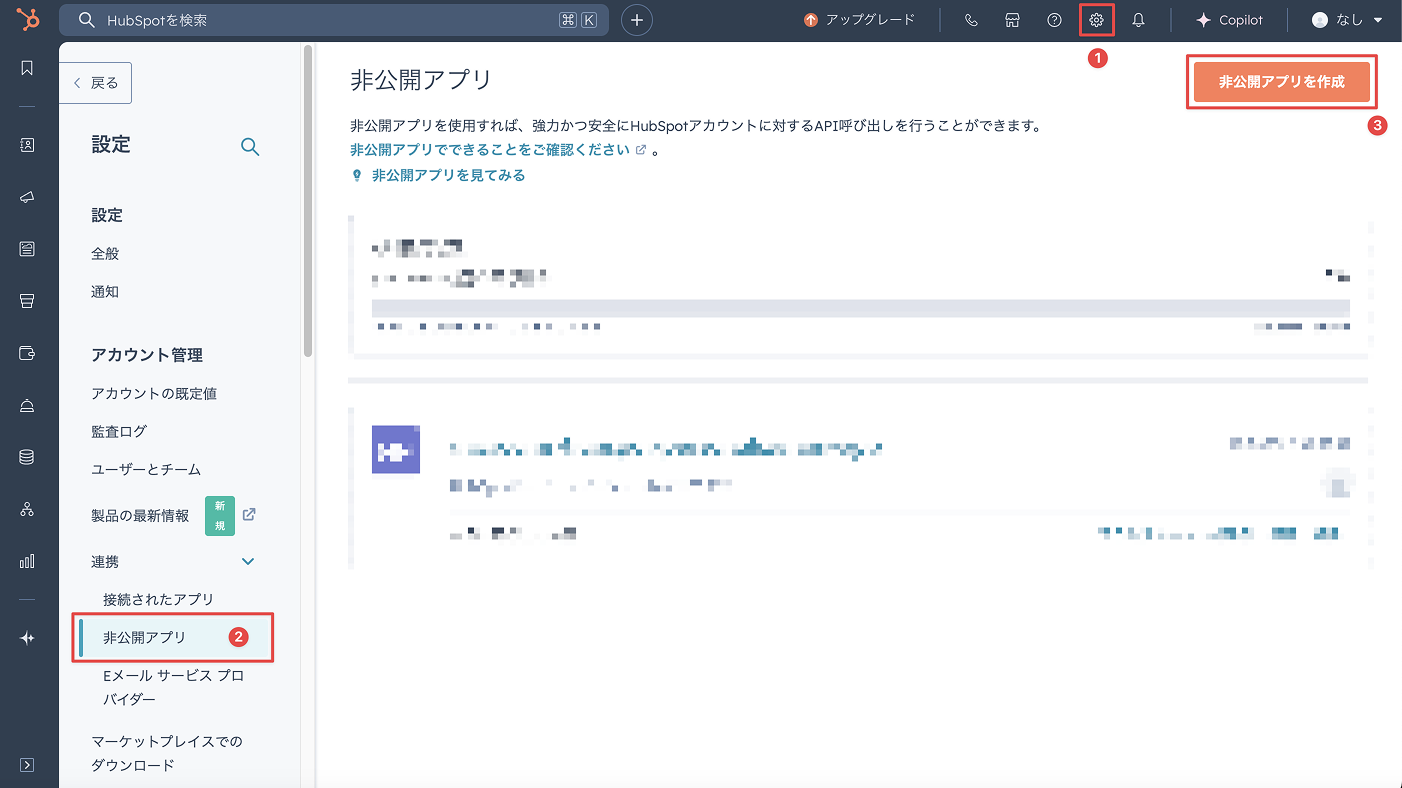
アプリ名や説明は任意ですが、用途がわかりやすいように設定しておきましょう。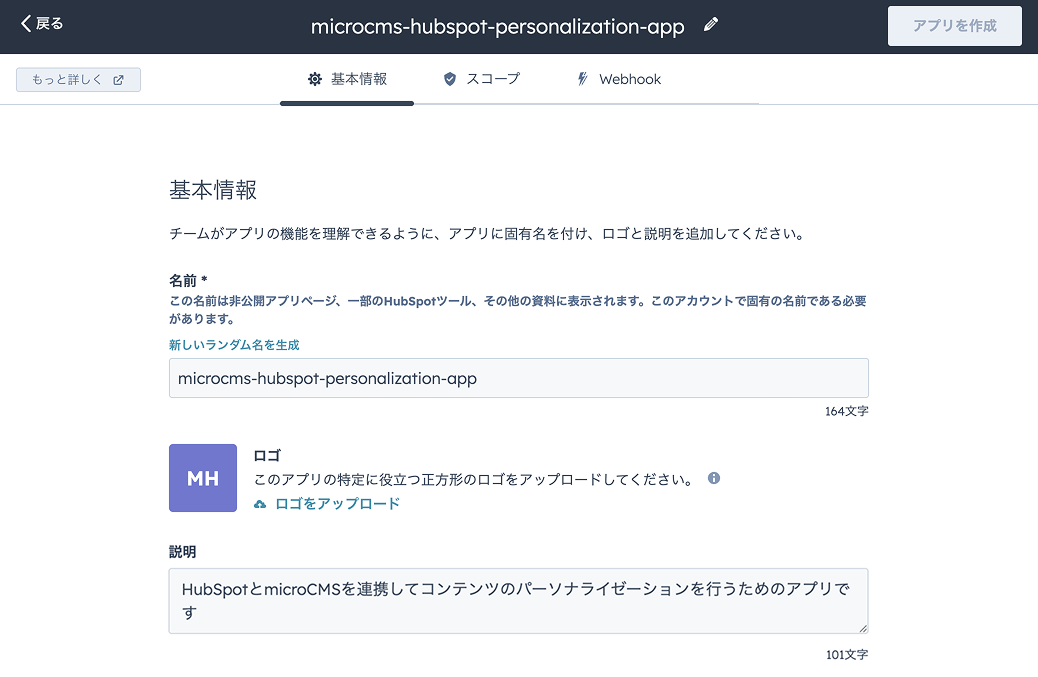
スコープ(権限)を設定する画面では、今回はContacts APIを利用するため、crm.objects.contacts.readを有効にしてください。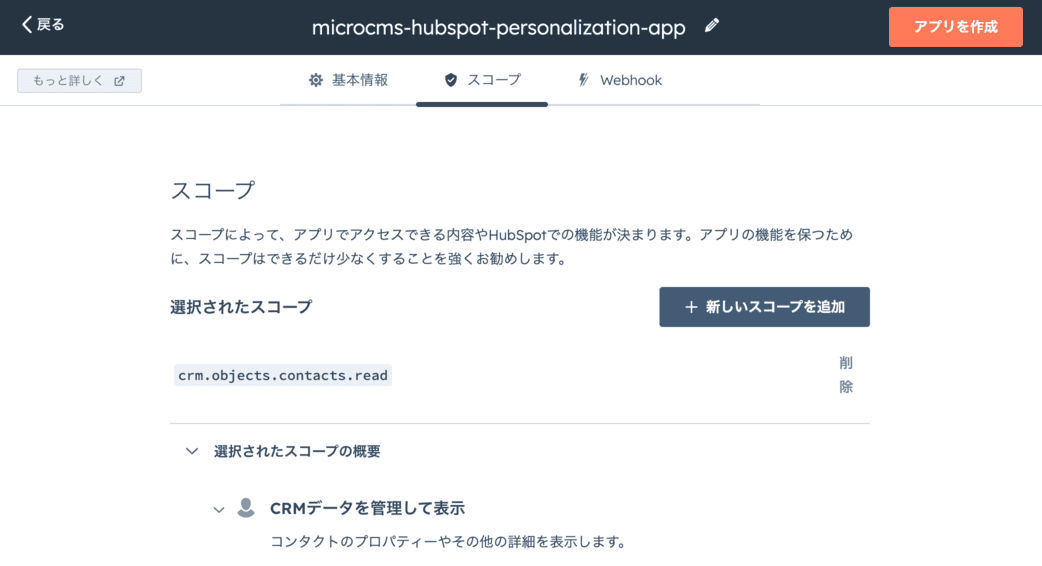
アプリを作成すると、トークンが発行されます。
このトークンはHubSpot APIを叩く際の認証ヘッダーに必要になります。後ほど環境変数として読み込みます。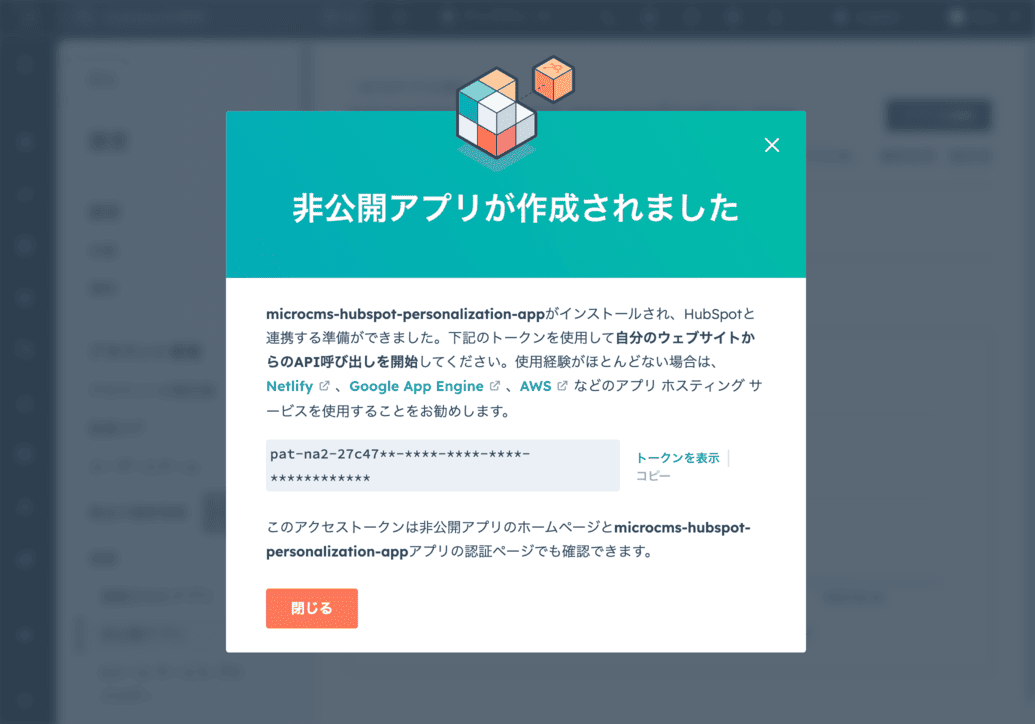
2. microCMSのセットアップ
microCMSで表示するコンテンツを準備します。
API作成
性別および居住地域別のセグメント用、記事用にAPIを3つ作成します。
1. セグメント(性別)
エンドポイントはsegments_gender、APIの型はリスト形式です。
APIスキーマ
名前用フィールド
- フィールドID:
name - 表示名:名前
- 種類:テキストフィールド
2. セグメント(居住地域)
エンドポイントはsegments_residence_area、APIの型はリスト形式です。
APIスキーマ
名前用フィールド
- フィールドID:
name - 表示名:名前
- 種類:テキストフィールド
3. 記事
エンドポイントはposts、APIの型はリスト形式です。
APIスキーマ
タイトル用フィールド
- フィールドID:
title - 表示名:名前
- 種類:テキストフィールド
本文用フィールド
- フィールドID:
content - 表示名:本文
- 種類:リッチエディタ
サムネイル画像用フィールド
- フィールドID:
thumbnail - 表示名:サムネイル画像
- 種類:画像
セグメント(性別)用フィールド
- フィールドID:
segmentGender - 表示名:セグメント(性別)
- 種類:複数コンテンツ参照 - 参照先:セグメント(性別)
セグメント(居住地域)用フィールド
- フィールドID:
segmentResidenceArea - 表示名:セグメント(居住地域)
- 種類:複数コンテンツ参照 - 参照先:セグメント(居住地域)
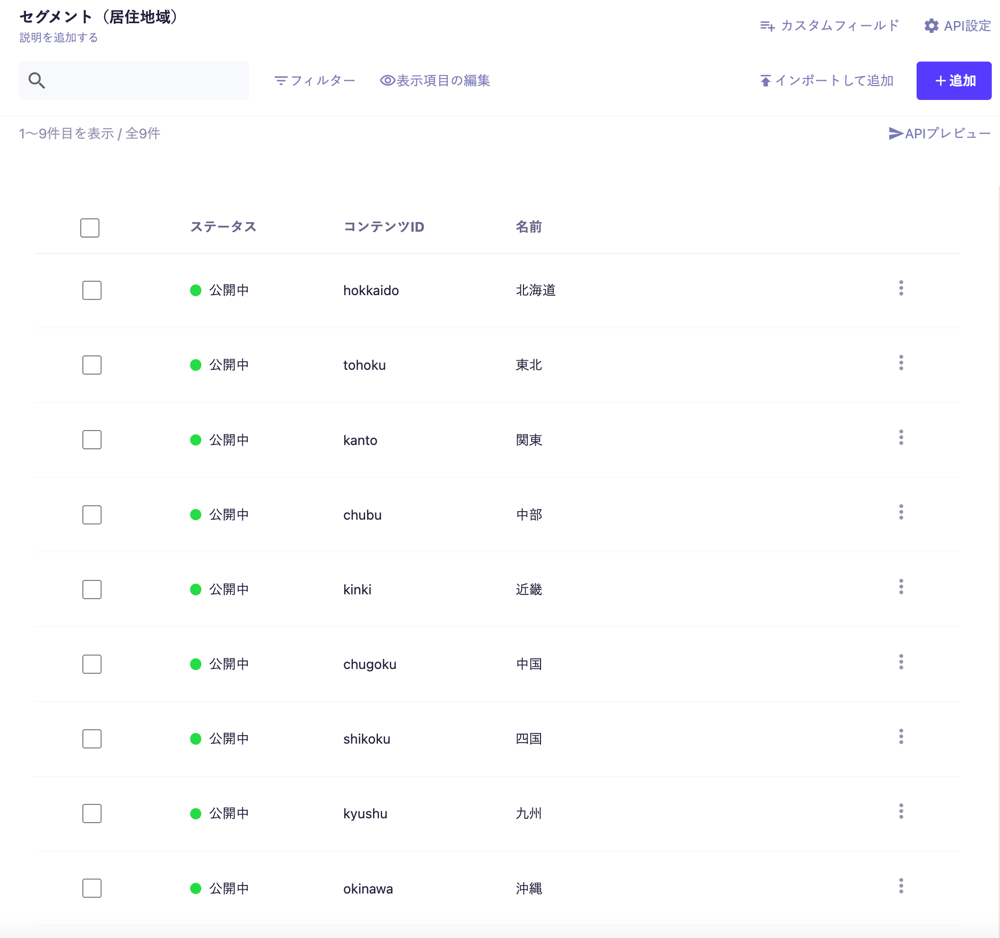
各セグメントの登録例
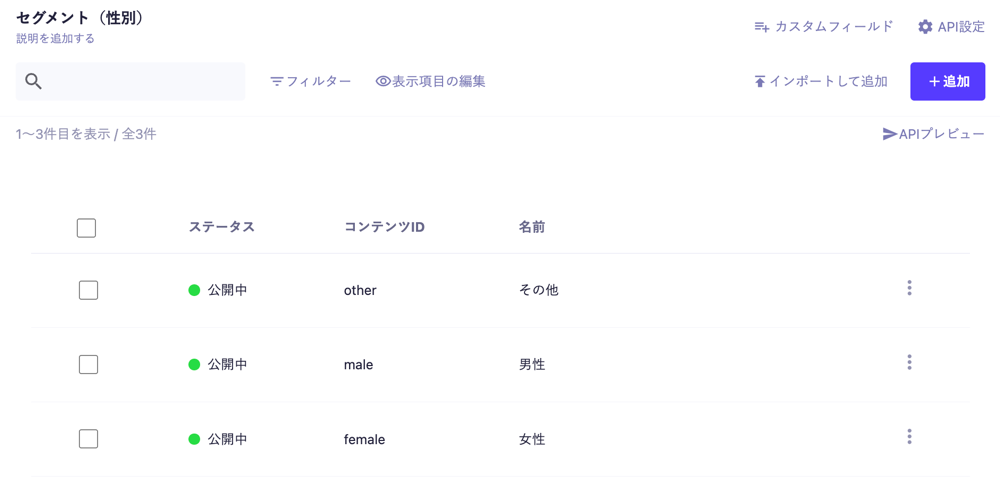
HubSpotの「コンタクトプロパティー」にてあらかじめ作成・設定しておいた性別・居住地域のラベル、内部名の通りに登録していきます。
セグメント(性別)
セグメント(居住地域)
記事の登録例
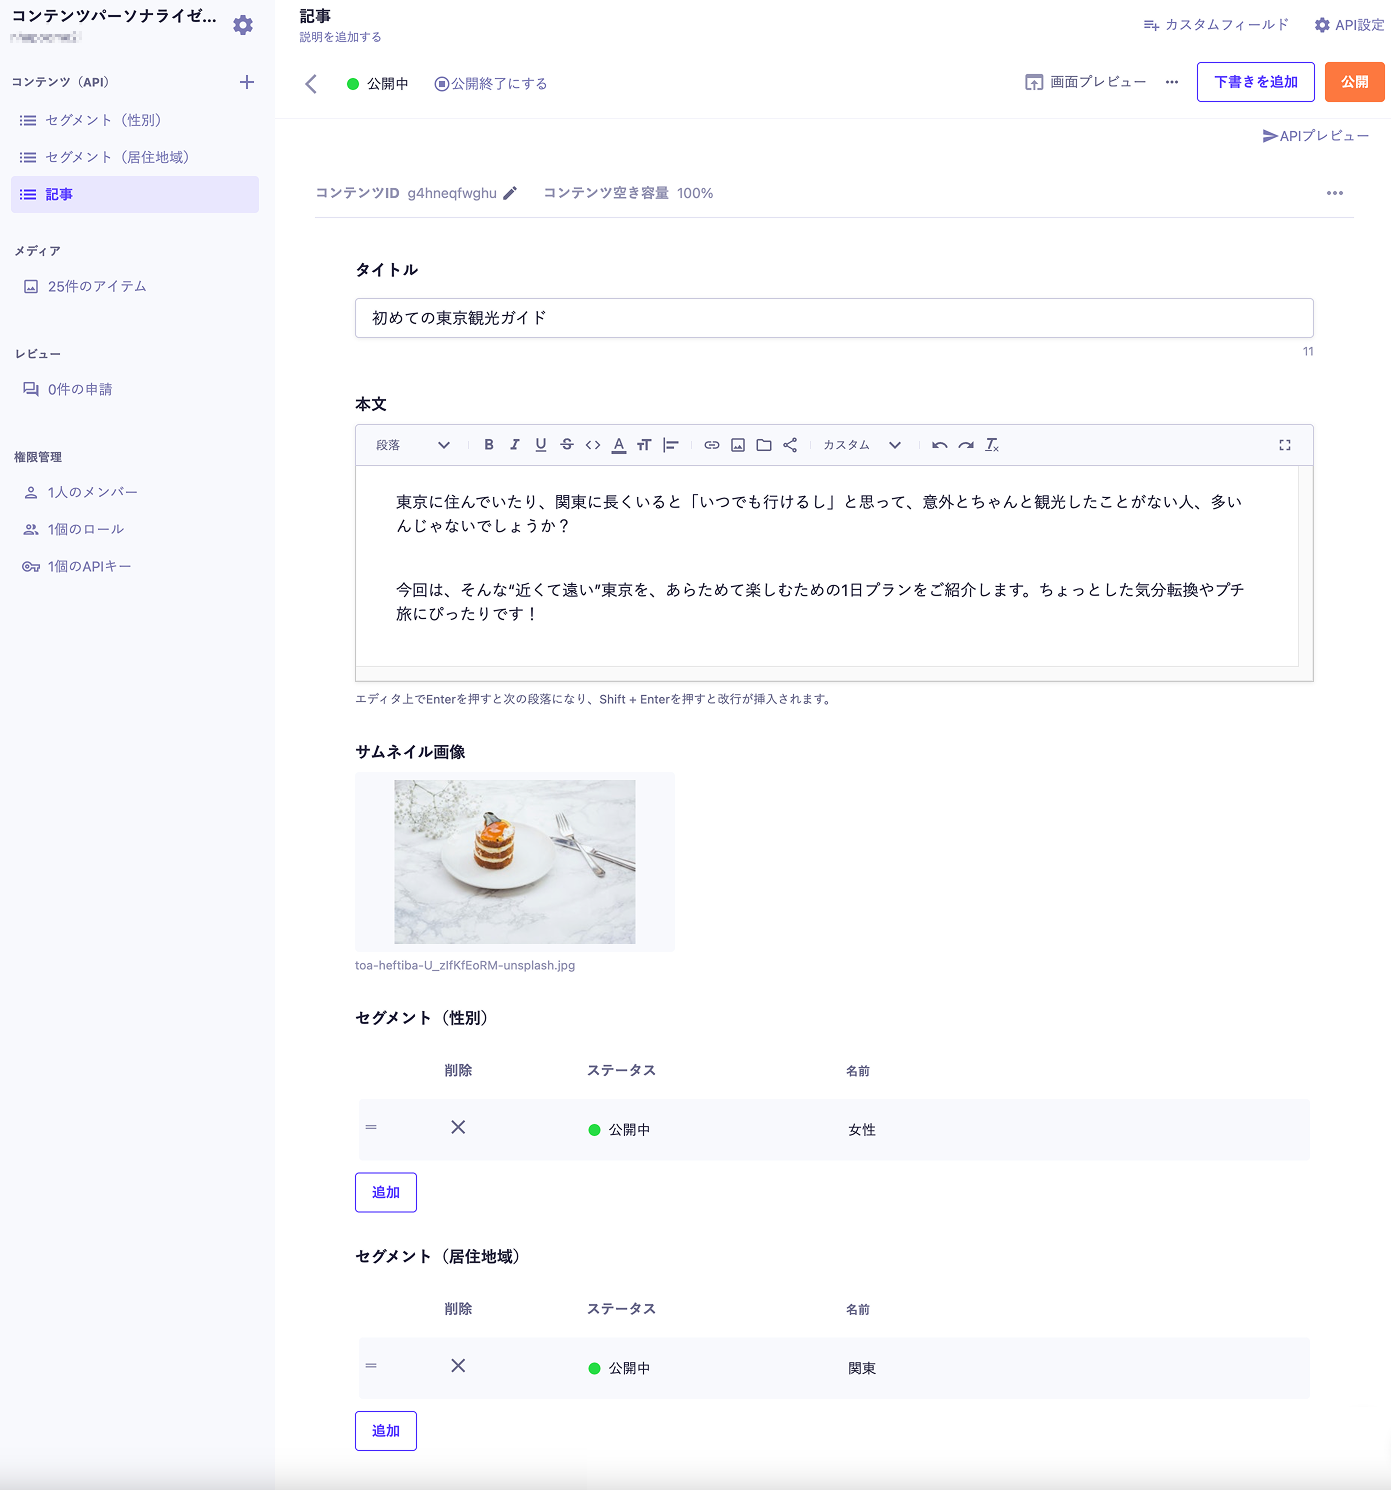
たとえば、「関東在住の女性におすすめしたい東京の観光情報」記事を登録する場合:
title:初めての東京観光ガイドsegmentGender:女性segmentResidenceArea:関東
このように、記事ごとに対象セグメントを割り当てることで、後ほどHubSpotのプロパティとマッチさせて出し分けができるようになります。
3. Next.js プロジェクトの作成とセットアップ
Next.jsの新規プロジェクトを作成し、必要な設定を行います。今回はApp Routerを利用します。
プロジェクトの作成
まずはNext.jsのCLI create-next-app を使って新しいプロジェクトを作成します。
npx create-next-app@latest microcms-hubspot-personalization
cd microcms-hubspot-personalization
対話形式で聞かれる設定は、以下のようにすると本記事の内容と一致します:
✔ Would you like to use TypeScript? … Yes
✔ Would you like to use ESLint? … Yes
✔ Would you like to use Tailwind CSS? … No
✔ Would you like your code inside a `src/` directory? … No
✔ Would you like to use App Router? (recommended) … Yes
✔ Would you like to use Turbopack for `next dev`? … No
✔ Would you like to customize the import alias (@/* by default)? … No
環境変数の設定
HubSpot APIへの認証には、非公開アプリで発行されたトークンを使用します。
プロジェクトのルートに .env.local ファイルを作成し、以下のように記述してください:
HUBSPOT_PRIVATE_APP_TOKEN=xxxxxxxxxxxxxxxxxxxxxxxx
MICROCMS_API_KEY=xxxxxxxxxxxxxxxxxxxxxxxx
MICROCMS_SERVICE_DOMAIN=xxxxxxxx
HUBSPOT_PRIVATE_APP_TOKEN
1でHubSpotの非公開アプリを作成した際に発行されたトークンを入力してください
MICROCMS_API_KEY
microCMS 管理画面の「サービス設定 > API キー」から確認することができます。
MICROCMS_SERVICE_DOMAIN
microCMS 管理画面の URL(https://xxxxxxxx.microcms.io)の xxxxxxxx の部分です。
ライブラリのインストール
microCMSのJavaScriptのSDKであるmicrocms-js-sdkをインストールします。
npm install microcms-js-sdk4. HubSpotからユーザー情報を取得してCookieに保存する
ここでは、HubSpotに登録されたユーザー情報(性別や居住地域)を取得し、それをCookieに保存する仕組みを実装します。保存されたCookieは、次回以降のアクセス時に読み取って記事の出し分けに活用されます。これによって、HubSpotのAPIを呼び出す回数を削減できます。
※非公開アプリから実行できる呼び出しの回数は、アカウントの契約内容によって異なります。(参考:HubSpot API | 利用ガイドライン | HubSpot)
APIルートを作成
初回アクセス時にHubSpot APIを叩き、取得したユーザープロパティを hubspot_properties というCookieに保存するAPIルートを作成します。
以下は app/api/user-properties/route.ts の実装例です。
// app/api/user-properties/route.ts
import { cookies } from 'next/headers';
import { NextResponse } from 'next/server';
import { getHubSpotUserProperties } from '@/libs/segment';

const COOKIE_NAME = 'hubspot_properties';

export async function GET() {
  const cookieStore = await cookies();
  const cached = cookieStore.get(COOKIE_NAME)?.value;

  if (cached) {
    try {
      const data = JSON.parse(decodeURIComponent(cached));
      return NextResponse.json(data);
    } catch {}
  }

  const props = await getHubSpotUserProperties();
  if (!props) return NextResponse.json({ error: 'Not found' }, { status: 404 });

  const res = NextResponse.json(props);
  res.cookies.set({
    name: COOKIE_NAME,
    value: encodeURIComponent(JSON.stringify(props)),
    maxAge: 60 * 60 * 24 * 7, // 1週間
    path: '/',
    httpOnly: false,
  });

  return res;
}
ユーザー情報を取得する関数の準備
HubSpot APIを叩いてユーザー情報を取得する関数を libs/segment.ts に記述しておきます。
// libs/segment.ts
import { cookies } from 'next/headers';

const HUBSPOT_TOKEN = process.env.HUBSPOT_PRIVATE_APP_TOKEN!;
const HUBSPOT_COOKIE_NAME = 'hubspotutk';

export type HubSpotUserProperties = {
  gender: string | null;
  residenceArea: string | null;
};

export async function getHubSpotUserProperties(): Promise<HubSpotUserProperties | null> {
  const cookieStore = cookies();
  const hubspotUtk = (await cookieStore).get(HUBSPOT_COOKIE_NAME)?.value;

  if (!hubspotUtk) return null;

  const contactIdRes = await fetch(
    `https://api.hubapi.com/contacts/v1/contact/utk/${hubspotUtk}/profile`,
    {
      headers: {
        Authorization: `Bearer ${HUBSPOT_TOKEN}`,
        'Content-Type': 'application/json',
      },
      cache: 'no-store',
    }
  );

  if (!contactIdRes.ok) return null;
  const contactId = (await contactIdRes.json()).vid;

  const contactRes = await fetch(
    `https://api.hubapi.com/crm/v3/objects/contacts/${contactId}?properties=gender,residence_area`,
    {
      headers: {
        Authorization: `Bearer ${HUBSPOT_TOKEN}`,
        'Content-Type': 'application/json',
      },
      cache: 'no-store',
    }
  );

  if (!contactRes.ok) return null;
  const data = await contactRes.json();
  const properties = data.properties || {};

  return {
    gender: properties.gender ?? null,
    residenceArea: properties.residence_area ?? null,
  };
}
初回アクセス時にAPIを叩く
Cookieが未設定の状態でページにアクセスされた場合は、クライアント側から /api/user-properties を叩くようにします。
// components/LoadUserProperties/index.tsx
'use client';
import { useEffect } from 'react';

export default function LoadUserProperties() {
  useEffect(() => {
    const cookies = document.cookie.split('; ').map((c) => c.trim());
    const hasCookie = cookies.some((c) => c.startsWith('hubspot_properties='));

    if (!hasCookie) {
      fetch('/api/user-properties'); // 初回のみCookie保存
    }
  }, []);

  return null;
}
これを page.tsx にインポートして使用します。
// app/page.tsx
import LoadUserProperties from '@/components/LoadUserProperties';

return (
  <>
    <LoadUserProperties />
    {/* その他のコンテンツ */}
  </>
);
Cookieの構造例
保存されるCookie(hubspot_properties)の中身は、以下のような構造です。
{
  "gender": "female",
  "residenceArea": "kanto"
}開発サーバーを立ち上げ、デベロッパーツールからCookieを確認すると、hubspot_propertiesという名前でユーザー情報が保存されています。
この情報をもとに、次回アクセス時にはサーバー側でユーザー情報を取得せずに、microCMSの記事をフィルタリングすることができます。
5. セグメント情報をもとにおすすめ記事を取得する
このセクションでは、保存されたhubspot_propertiesのCookieをもとに、ユーザーに合ったおすすめ記事のみを取得・表示する仕組みを実装します。
Cookieの値を読み取る
サーバーサイド(app/page.tsx)では、Cookieの内容を読み取ってユーザーの性別・居住地域を判定し、その情報を使って記事取得のクエリを組み立てます。libs/segment.ts に以下の関数を定義しておきます:
// libs/segment.ts
export async function getUserPropertiesFromCookie(): Promise<HubSpotUserProperties | null> {
  const raw = (await cookies()).get('hubspot_properties')?.value;
  if (!raw) return null;

  try {
    return JSON.parse(decodeURIComponent(raw));
  } catch {
    return null;
  }
}
microCMSからセグメントに合致する記事を取得する
記事を取得するための関数 getRecommendedPosts を libs/microcms.ts に定義します。
記事には複数のセグメント(性別・居住地域)が設定されているため、filters パラメータを使用して部分一致検索を行います。
// libs/microcms.ts
import { createClient } from 'microcms-js-sdk';
import type {
  MicroCMSQueries,
  MicroCMSImage,
  MicroCMSDate,
  MicroCMSContentId,
} from 'microcms-js-sdk';

// セグメントの型定義
export type Segment = {
  name: string;
} & MicroCMSContentId &
  MicroCMSDate;

// ポストの型定義
export type Post = {
  title: string;
  content: string;
  thumbnail?: MicroCMSImage;
  segment?: Segment[];
} & MicroCMSContentId;

if (!process.env.MICROCMS_SERVICE_DOMAIN) {
  throw new Error('MICROCMS_SERVICE_DOMAIN is required');
}

if (!process.env.MICROCMS_API_KEY) {
  throw new Error('MICROCMS_API_KEY is required');
}

export const client = createClient({
  serviceDomain: process.env.MICROCMS_SERVICE_DOMAIN,
  apiKey: process.env.MICROCMS_API_KEY,
});

export const getRecommendedPosts = async (props: {
  gender: string | null;
  residenceArea: string | null;
}) => {
  const filters: string[] = [];

  if (props.gender) {
    filters.push(`segmentGender[contains]${props.gender}`);
  }
  if (props.residenceArea) {
    filters.push(`segmentResidenceArea[contains]${props.residenceArea}`);
  }

  if (filters.length === 0) return [];

  const queries: MicroCMSQueries = {
    limit: 10,
    filters: filters.join('[and]'),
  };

  const listData = await client
    .getList<Post>({
      endpoint: 'posts',
      queries,
    })
    .catch(() => null);

  return listData?.contents ?? [];
};
🔍 補足:なぜ contains を使うのか?
記事側の segmentGender・segmentResidenceArea は「複数コンテンツ参照」フィールドになっており、1つの記事に複数のセグメントが紐づいていることを想定しています。
このため、完全一致(equals)ではなく「含まれているかどうか」を調べる contains を使用します。
page.tsx でおすすめ記事を表示する
Cookieを読み込み、条件に合った記事を取得して「おすすめコンテンツ」として表示します。HubSpot側に情報が登録されていない場合は、このセクションは表示されません。
// app/page.tsx
import LoadUserProperties from '@/components/LoadUserProperties';
import RecommendedSlider from '@/components/RecommendedSlider'; // 後ほど作成します
import { getRecommendedPosts } from '@/libs/microcms';
import { getUserPropertiesFromCookie } from '@/libs/segment';

export default async function Page() {
  const userProperties = await getUserPropertiesFromCookie();
  const recommendedPosts = userProperties
    ? await getRecommendedPosts(userProperties)
    : [];

  return (
    <>
      <LoadUserProperties />
      {recommendedPosts.length > 0 && (
        // 注:後ほどRecommendedSliderコンポーネントを作成します
        <RecommendedSlider posts={recommendedPosts} />
      )}
    </>
  );
}
表示結果(例)
たとえば、以下のようなCookieが保存されているとします:
{
  "gender": "female",
  "residenceArea": "kanto"
}
このとき、以下のようなmicroCMSのfiltersが組み立てられます:
segmentGender[contains]female[and]segmentResidenceArea[contains]kanto→ この条件に合致する記事だけが RecommendedSlider に表示される、という流れです。
6. おすすめコンテンツをスライダーで表示する
RecommendedSlider コンポーネントを作成し、取得したおすすめ記事をスライダーで表示します。
ここでは、軽量で使いやすいスライダーライブラリ Splide を使用します。
Splide のインストール
ライブラリを追加します:
npm install @splidejs/react-splide @splidejs/splideコンポーネントの作成
// components/RecommendedSlider/index.tsx
'use client';

import { Splide, SplideSlide } from '@splidejs/react-splide'
import type { Post } from '@/libs/microcms';
import styles from './index.module.css';
import '@splidejs/splide/css';

type Props = {
  posts: Post[];
};

export default function RecommendedSlider({ posts }: Props) {
  return (
    <section className={styles.recommendationSection}>
      <h2 className={styles.heading}>あなたにおすすめのコンテンツ</h2>
      <Splide
        options={{
          type: 'loop',
          perPage: 1,
          gap: '1rem',
          breakpoints: {
            768: { perPage: 1 },
            1024: { perPage: 2 },
            1280: { perPage: 3 },
          },
        }}
        aria-label="おすすめコンテンツスライダー"
      >
        {posts.map((post) => (
          <SplideSlide key={post.id}>
            <a href={`/posts/${post.id}`} className={styles.card}>
              {post.thumbnail?.url && (
                <div
                  className={styles.thumbnailWrapper}
                  style={{ backgroundImage: `url(${post.thumbnail.url})` }}
                >
                  <div className={styles.overlay}>
                    <h3 className={styles.title}>{post.title}</h3>
                  </div>
                </div>
              )}
            </a>
          </SplideSlide>
        ))}
      </Splide>
    </section>
  );
}
スタイルの追加
以下のcssを追加します。
// components/RecommendedSlider/index.module.css
.recommendationSection {
  margin: 2rem;
}

.heading {
  font-size: 1.25rem;
  font-weight: bold;
  margin-bottom: 1rem;
}

.card {
  display: block;
  border-radius: 12px;
  overflow: hidden;
  transition:
    transform 0.3s ease,
    box-shadow 0.3s ease;
  text-decoration: none;
}

.card:hover {
  transform: scale(1.03);
  box-shadow: 0 8px 20px rgba(0, 0, 0, 0.25);
}

.thumbnailWrapper {
  width: 100%;
  height: 200px;
  background-size: cover;
  background-position: center;
  border-radius: 12px;
  position: relative;
  display: flex;
  align-items: flex-end;
}

.overlay {
  width: 100%;
  padding: 16px;
  background: linear-gradient(to top, rgba(0, 0, 0, 0.6), transparent 80%);
  position: absolute;
  bottom: 0;
  left: 0;
}

.title {
  font-size: 1rem;
  font-weight: 600;
  color: #ffffff;
  z-index: 1;
  margin: 0;
}
実際の表示イメージ
同じURLにアクセスしても、ユーザーのプロパティによって異なるコンテンツが表示されています👏
性別:男性、居住地域:北海道のユーザー

性別:女性、居住地域:九州のユーザー

おわりに
ここまで、HubSpotで取得したユーザー情報(性別・居住地域)を活用して、Next.jsとmicroCMSを連携し、コンテンツのセグメント出し分けを実現する方法をご紹介してきました。
今後の応用例としては、以下などが考えられます:
- HubSpotの他プロパティ(年齢層、業種など)を組み合わせた細かいセグメント化
- Salesforceなど、他のCRM/MAツールとの連携
- おすすめ表示だけでなく、CTAの出し分けやLPの切り替えなどへの展開
本記事が「自社でセグメント別にコンテンツを出し分けしたい」とお考えの方の参考になれば幸いです。

