こんにちは、しょうみゆです。
みなさんはmicroCMSのカスタムフィールドという機能をご存知でしょうか?
カスタムフィールドは、複数のフィールドを組み合わせたブロックのようなものです。要件に合わせて自由にフィールドを組み合わせたり、レイアウトを調整することができます。
このカスタムフィールドを使用して、ブログの記事詳細ページに資料ダウンロードや会員登録に繋げるためのブロック(以下CVエリアとします)を作成していきましょう。
完成イメージ
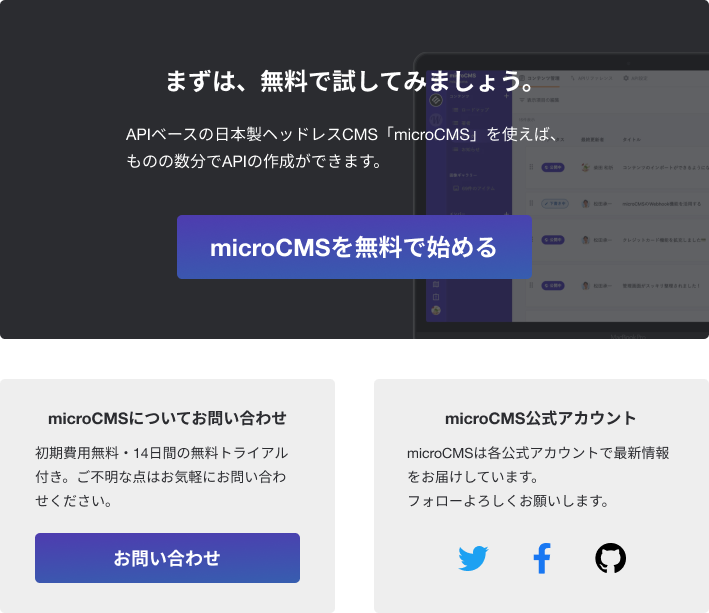
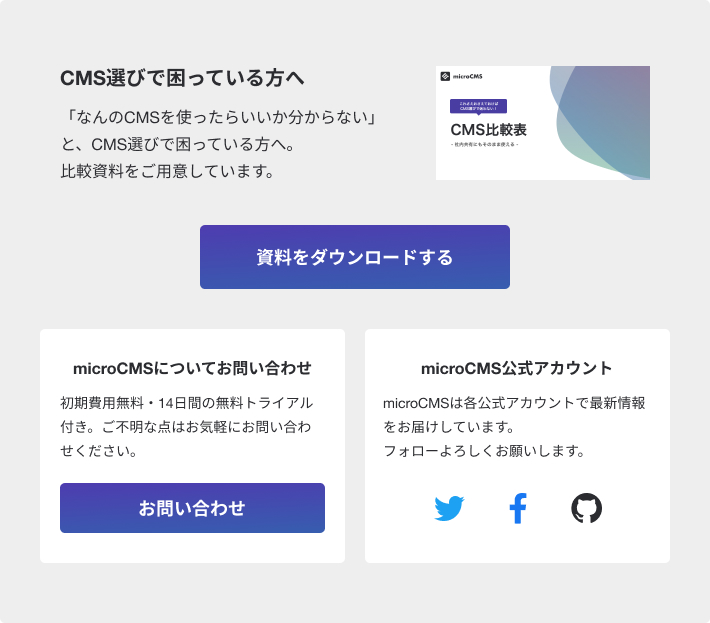
会員登録と資料ダウンロードの要件に合わせて2パターンのデザインを用意しました。完成イメージは下記の通りです。
(microCMSブログで実際に使用しているので、ページ下部で確認してみてください!)
会員登録
資料ダウンロード
仕様について
通常の記事では会員登録用のCVエリアをデフォルトとして表示して、資料ダウンロードなどの会員登録以外を表示させたい場合に管理画面から入力をすることで表示を分岐させます。
したがって、これまでたくさんの記事を書いてきたブログやサイトでも崩れることなく異なるCVエリアを追加することが可能となっています。
カスタムフィールドの作成とAPI設定
まずはmicroCMSの管理画面から編集していきましょう。
カスタムフィールドの作成
カスタムフィールドを作成します。
今回はブログページ下部に設置するので、ブログの管理画面の上部から『カスタムフィールド』を選択し、新しいカスタムフィールドを作成しましょう。
カスタムフィールド名に『サムネイル』、カスタムフィールドIDに『thumbnail』としました。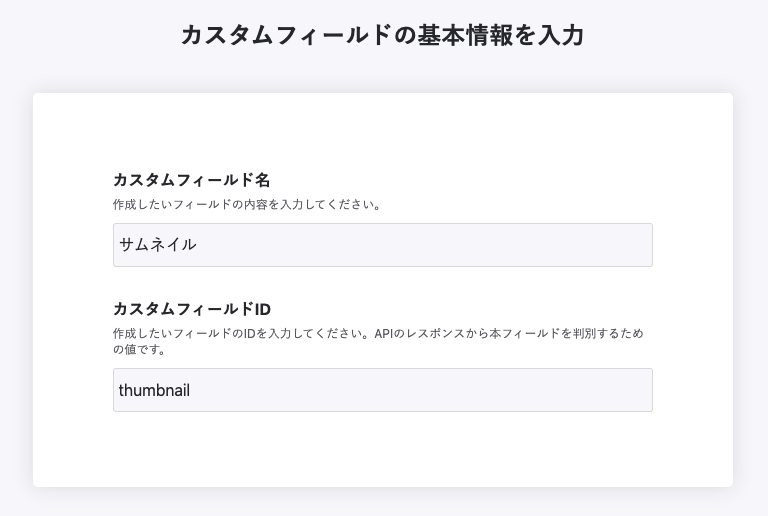
APIスキーマの設定は下記のように設定します。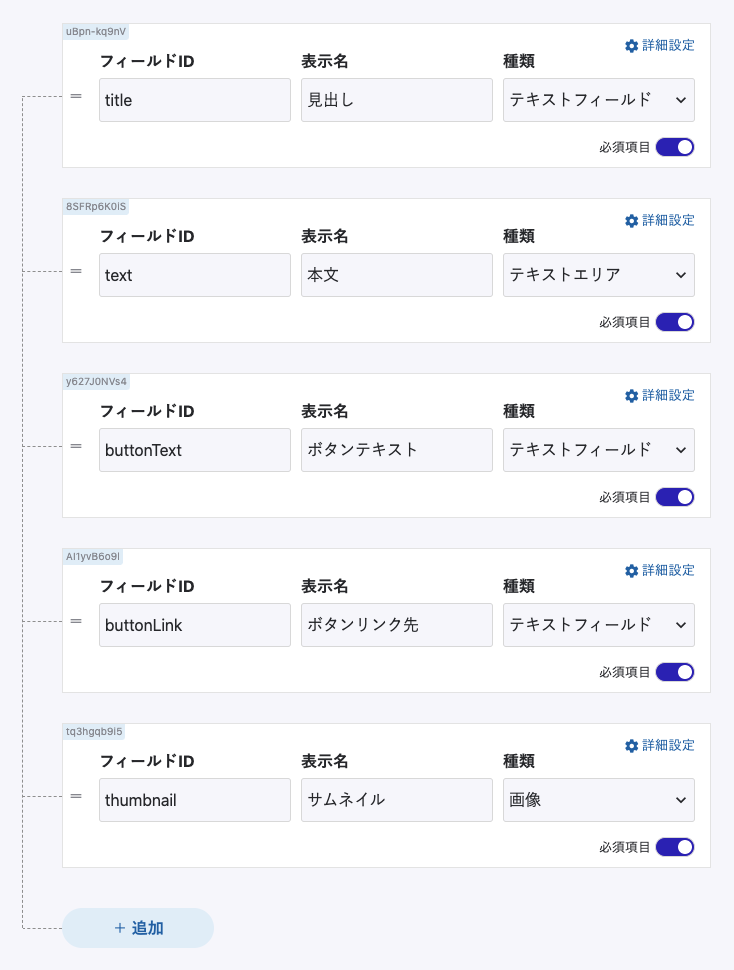
設定を保存して下記のようになっていればカスタムフィールドは完成です!
繰り返しフィールドとしてAPIに追加する
作成したカスタムフィールドをAPIに追加しましょう。
今回は管理画面での見やすさを考慮して繰り返しフィールドとして追加します。
ブログのAPI設定 > APIスキーマを開きます。
最下部にcv_pointという名前で繰り返しフィールドのスキーマを追加しました。
未入力の場合はデフォルトのCVポイントを表示させるので、必須項目はオフにしておきます。
繰り返しフィールドではあるものの、2つ以上の入力を受け付けたくないので
cv_pointの詳細設定で繰り返しフィールドの数を最大1に設定します。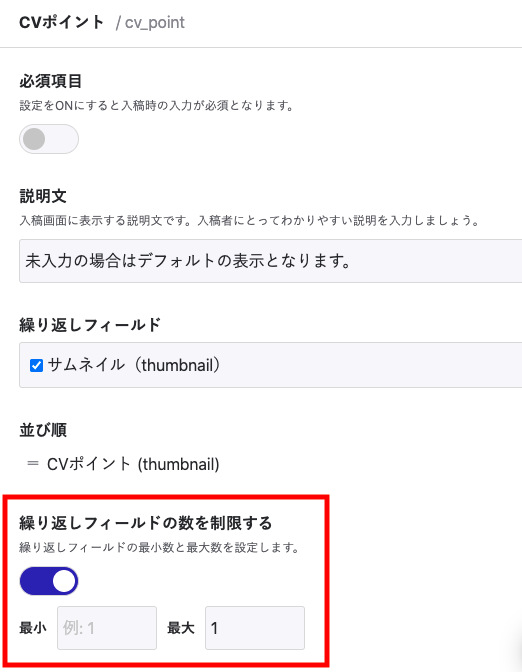
設定を保存したら下記のように表示されるようになります。
これで管理画面での設定は完了です!
コンポーネントを作成
続いてNuxtでコンポーネントを作成していきます。
デフォルトのCVエリアを作成
まずはAPI関係なく、デフォルトで表示させたいCVエリアを作成しましょう。
components/ConversionPoint.vueというファイルを作成して、下記のように記述しました。
// components/ConversionPoint.vue

<template>
  <div class="cvPoint">
    <div class="cvBackground">
      <div class="cvContainer">
        <h2 class="mainTitle">まずは、無料で試してみましょう。</h2>
        <p class="mainContents">APIベースの日本製ヘッドレスCMS「microCMS」を使えば、<br />ものの数分でAPIの作成ができます。</p>
        <p class="buttonWrapper">
          <a class="button" target="site" href="https://microcms.io/">microCMSを無料で始める</a>
        </p>
      </div>
    </div>

    <div class="bottom">
      <div class="background">
        <h3 class="subTitle">microCMSについてお問い合わせ</h3>
        <p>
          初期費用無料・14日間の無料トライアル付き。ご不明な点はお気軽にお問い合わせください。
        </p>
        <a
          href="https://microcms.io/contact"
          class="buttonSmall"
          >お問い合わせ</a
        >
      </div>


      <div class="background">
        <h3 class="subTitle">microCMS公式アカウント</h3>
        <p>
          microCMSは各公式アカウントで最新情報をお届けしています。<br />フォローよろしくお願いします。
        </p>
        <ul class="iconList">
          <li class="listItem">
            <a target="_blank" href="https://twitter.com/micro_cms">
              <img src="/images/icon_twitter.svg" alt="twitter" />
            </a>
          </li>
          <li class="listItem">
            <a target="_blank" href="https://www.facebook.com/microcms.io/">
              <img src="/images/icon_facebook.svg" alt="facebook" />
            </a>
          </li>
          <li class="listItem">
            <a target="_blank" href="https://github.com/microcmsio">
              <img src="/images/icon_github.svg" alt="github" />
            </a>
          </li>
        </ul>
      </div>
    </div>
  </div>
</template>

<style scoped>
@media (min-width: 820px) {
  .cvPoint {
    margin: 60px 0;
  }

  .cvBackground {
    padding: 60px 1em;
    background-image: url('/images/bg_microcms_screen_black.jpg');
    background-position: center center;
    background-repeat: no-repeat;
    background-size: cover;
    color: #fff;
    border-radius: 5px;
    margin-bottom: 40px;
  }

  .mainTitle {
    font-size: 24px;
    font-weight: bold;
    line-height: 1.7;
    margin-bottom: 20px;
    text-align: center;
  }

  .cvContainer {
    max-width: 457px;
    margin: auto;
  }

  .mainContents {
    line-height: 1.7;
    margin-bottom: 40px;
  }

  .buttonWrapper {
    text-align: center;
  }

  .button {
    display: inline-block;
    border: none;
    border-radius: 5px;
    background: linear-gradient(to right bottom, #5630af, #3067af);
    color: #fff;
    text-align: center;
    font-size: 24px;
    font-weight: bold;
    padding: 16px 72px;
    cursor: pointer;

    &:hover {
      background: linear-gradient(to right bottom, #46209f, #20579f);
    }
  }

  .background {
    background-color: #eee;
    border-radius: 5px;
    padding: 20px 35px 30px;
  }

  .subTitle {
    font-size: 16px;
    font-weight: bold;
    text-align: center;
    margin-bottom: 10px;
  }

  .bottom {
    display: grid;
    grid-template-columns: repeat(2, 1fr);
    grid-template-rows: auto;
    grid-gap: 5%;
  }

  .buttonSmall {
    display: block;
    line-height: 1;
    border-radius: 5px;
    background: linear-gradient(to right bottom, #5630af, #3067af);
    color: #fff;
    text-align: center;
    font-size: 18px;
    padding: 16px;
    font-weight: bold;
    cursor: pointer;
    margin-top: 20px;

    &:hover {
      background: linear-gradient(to right bottom, #46209f, #20579f);
    }
  }

  .iconList {
    display: flex;
    justify-content: center;
    align-items: center;
    margin: 30px auto 0;
  }

  .listItem {
    img {
      max-width: 32px;
      max-height: 32px;
    }
  }

  .listItem + .listItem {
    margin-left: 45px;
  }
}

@media (max-width: 820px) {
  .cvPoint {
    margin: 80px 0;
  }

  .cvBackground {
    padding: 40px 2em;
    background-image: url('/images/bg_microcms_screen_black.jpg');
    background-position: center center;
    background-repeat: no-repeat;
    background-size: cover;
    color: #fff;
    border-radius: 5px;
    margin-bottom: 20px;
  }

  .mainTitle {
    font-size: 18px;
    font-weight: bold;
    line-height: 1.7;
    margin-bottom: 10px;
  }

  .cvContainer {
    max-width: 457px;
    margin: auto;
  }

  .mainContents {
    line-height: 1.7;
    margin-bottom: 40px;
  }

  .buttonWrapper {
    text-align: center;
  }

  .button {
    display: block;
    border: none;
    border-radius: 5px;
    background: linear-gradient(to right bottom, #5630af, #3067af);
    color: #fff;
    text-align: center;
    font-size: 18px;
    font-weight: bold;
    line-height: 1;
    padding: 16px 1em;
    cursor: pointer;

    &:hover {
      background: linear-gradient(to right bottom, #46209f, #20579f);
    }
  }

  .background {
    background-color: #eee;
    border-radius: 5px;
    padding: 20px 35px 30px;
    margin-bottom: 20px;
  }

  .subTitle {
    font-size: 16px;
    font-weight: bold;
    text-align: center;
    margin-bottom: 10px;
  }

  .buttonSmall {
    display: block;
    line-height: 1;
    border-radius: 5px;
    background: linear-gradient(to right bottom, #5630af, #3067af);
    color: #fff;
    text-align: center;
    font-size: 18px;
    padding: 16px;
    font-weight: bold;
    cursor: pointer;
    margin-top: 20px;

    &:hover {
      background: linear-gradient(to right bottom, #46209f, #20579f);
    }
  }

  .iconList {
    display: flex;
    justify-content: center;
    align-items: center;
    margin: 30px auto 0;
  }

  .listItem {
    img {
      max-width: 32px;
      max-height: 32px;
    }
  }

  .listItem + .listItem {
    margin-left: 45px;
  }
}
</style>
コンポーネントの作成ができたら、ブログページの下部に差し込んで表示を確認してみましょう。
// pages/_slug/index.vue
          <!-- 中略 -->
          <div class="container">
            <ConversionPoint />
          </div>
ブログページで下記のように表示されていればOKです。
表示内容を分岐させる
CVエリアで表示させる内容を分岐させていきます。pages/_slug/index.vueで、すでにCVエリアのAPIをcv_pointとして取得できている状態になっているので、作成したコンポーネントにデータを渡します。
また、スタイルや表示を分岐させるためのthemeというpropsには、『thumbnail』か空の値が渡るようにします。
この後、themeとcontentsというpropsをコンポーネント側で作成します。
// pages/_slug/index.vue

<ConversionPoint
  :contents="cv_point"
  :theme="
    data.cv_point === null || data.cv_point.length <= 0
      ? ''
      : 'thumbnail'
  "
/>
コンポーネント側で渡されたデータを受け取るため、propsを作成します。contentsに関して、繰り返しフィールドは配列で取得されるのでpropsの型をArrayとしておきましょう。
以後、cv_pointというAPIデータはコンポーネント内でcontentsとして扱います。
// components/ConversionPoint.vue

<script>
export default {
  props: {
    contents: {
      type: Array,
      required: false,
      default: () => [],
    },

    theme: {
      type: String,
      required: false,
      default: '',
      validator: (value) => ['', 'thumbnail'].includes(value) !== -1,
    },
  },
};
</script>
propsで渡されたcontentsは未入力の場合は空で渡されるので、空の場合はデフォルトの内容になるようにcomputed内で関数を作成します。
// components/ConversionPoint.vue

  computed: {
    getContents() {
      if (this.contents === null || this.contents.length <= 0) {
        return {
          title: 'まずは、無料で試してみましょう。',
          text: 'APIベースの日本製ヘッドレスCMS「microCMS」を使えば、\nものの数分でAPIの作成ができます。',
          buttonText: 'microCMSを無料で始める',
          buttonLink: `https://microcms.io/`,
        };
      } else {
        return this.contents[0];
      }
    },
  },
作成したgetContents関数とthemepropsを使用してtemplate内で分岐します。
// components/ConversionPoint.vue

<template>
  <div :class="{ [`cvPoint--${theme}`]: theme !== '' }" class="cvPoint">
    <div v-if="theme === 'thumbnail'" class="upper">
      <div class="upperContents">
        <div>
          <h2 class="mainTitle">{{ getContents.title }}</h2>
          <p class="mainText">{{ getContents.text }}</p>
        </div>
        <figure class="thumbnail">
          <img :src="getContents.thumbnail.url" alt="" />
        </figure>
      </div>
      <p class="buttonWrapper">
        <a class="button" target="site" :href="getContents.buttonLink">{{
          getContents.buttonText
        }}</a>
      </p>
    </div>

    <div v-else class="cvBackground">
      <div class="cvContainer">
        <h2 class="mainTitle">{{ getContents.title }}</h2>
        <p class="mainContents">{{ getContents.text }}</p>
        <p class="buttonWrapper">
          <a class="button" target="site" :href="getContents.buttonLink">{{
            getContents.buttonText
          }}</a>
        </p>
      </div>
    </div>

    <!-- 略 -->
  </div>
</template>
最後にスタイルを追記して完成です!
// components/ConversionPoint.vue

<style scoped>
@media (min-width: 820px) {

  /* thumbnail theme */
  .cvPoint--thumbnail {
    background-color: #eee;
    padding: 60px 40px;

    img {
      max-width: 100%;
      vertical-align: top;
    }

    .upper {
      margin-bottom: 40px;
    }

    .upperContents {
      padding: 0 20px;
      display: grid;
      grid-template-columns: 60% auto;
      align-items: center;
      grid-gap: 5%;
    }

    .cvBackground {
      background: inherit;
    }

    .background {
      background-color: #fff;
      padding: 25px 20px 30px;
    }

    .mainTitle {
      text-align: left;
      margin-bottom: 15px;
    }

    .mainText {
      margin-bottom: 0;
    }

    .buttonWrapper {
      margin-top: 30px;
    }
  }
}

@media (max-width: 820px) {
  /* thumbnail theme */
  .cvPoint--thumbnail {
    background-color: #eee;
    padding: 40px 20px;

    img {
      max-width: 100%;
      vertical-align: top;
    }

    .upper {
      margin-bottom: 40px;
    }

    .cvBackground {
      background: inherit;
    }

    .thumbnail {
      margin-top: 20px;
    }

    .buttonWrapper {
      margin-top: 20px;
    }

    .button {
      padding: 20px 1em;
    }

    .background {
      background-color: #fff;
      padding: 25px 20px 30px;
    }

    .mainTitle {
      text-align: left;
      margin-bottom: 15px;
    }

    .mainText {
      margin-bottom: 0;
    }
  }
}
</style>
管理画面から実際に入力してみて、表示に問題がないか確認してみてください。
完成時のコード
完成したコードはこちらになります。
// components/ConversionPoint.vue

<template>
  <div :class="{ [`cvPoint--${theme}`]: theme !== '' }" class="cvPoint">
    <div v-if="theme === 'thumbnail'" class="upper">
      <div class="upperContents">
        <div>
          <h2 class="mainTitle">{{ getContents.title }}</h2>
          <p class="mainText">{{ getContents.text }}</p>
        </div>
        <figure class="thumbnail">
          <img :src="getContents.thumbnail.url" alt="" />
        </figure>
      </div>
      <p class="buttonWrapper">
        <a class="button" target="site" :href="getContents.buttonLink">{{
          getContents.buttonText
        }}</a>
      </p>
    </div>

    <div v-else class="cvBackground">
      <div class="cvContainer">
        <h2 class="mainTitle">{{ getContents.title }}</h2>
        <p class="mainContents">{{ getContents.text }}</p>
        <p class="buttonWrapper">
          <a class="button" target="site" :href="getContents.buttonLink">{{
            getContents.buttonText
          }}</a>
        </p>
      </div>
    </div>

    <div class="bottom">
      <div class="background">
        <h3 class="subTitle">microCMSについてお問い合わせ</h3>
        <p>
          初期費用無料・14日間の無料トライアル付き。ご不明な点はお気軽にお問い合わせください。
        </p>
        <a
          href="https://microcms.io/contact"
          class="buttonSmall"
          >お問い合わせ</a
        >
      </div>

      <div class="background">
        <h3 class="subTitle">microCMS公式アカウント</h3>
        <p>
          microCMSは各公式アカウントで最新情報をお届けしています。<br />フォローよろしくお願いします。
        </p>
        <ul class="iconList">
          <li class="listItem">
            <a target="_blank" href="https://twitter.com/micro_cms">
              <img src="/images/icon_twitter.svg" alt="twitter" />
            </a>
          </li>
          <li class="listItem">
            <a target="_blank" href="https://www.facebook.com/microcms.io/">
              <img src="/images/icon_facebook.svg" alt="facebook" />
            </a>
          </li>
          <li class="listItem">
            <a target="_blank" href="https://github.com/microcmsio">
              <img src="/images/icon_github.svg" alt="github" />
            </a>
          </li>
        </ul>
      </div>
    </div>
  </div>
</template>

<script>
export default {
  props: {
    contents: {
      type: Array,
      required: false,
      default: () => [],
    },

    theme: {
      type: String,
      required: false,
      default: '',
      validator: (value) => ['', 'thumbnail'].includes(value) !== -1,
    },
  },

  computed: {
    getContents() {
      if (this.contents === null || this.contents.length <= 0) {
        return {
          title: 'まずは、無料で試してみましょう。',
          text: 'APIベースの日本製ヘッドレスCMS「microCMS」を使えば、\nものの数分でAPIの作成ができます。',
          buttonText: 'microCMSを無料で始める',
          buttonLink: `https://microcms.io/`,
        };
      } else {
        return this.contents[0];
      }
    },
  },
};
</script>

<style scoped>
@media (min-width: 820px) {
  .cvPoint {
    margin: 60px 0;
  }

  .cvBackground {
    padding: 60px 1em;
    background-image: url('/images/bg_microcms_screen_black.jpg');
    background-position: center center;
    background-repeat: no-repeat;
    background-size: cover;
    color: #fff;
    border-radius: 5px;
    margin-bottom: 40px;
  }

  .mainTitle {
    font-size: 24px;
    font-weight: bold;
    line-height: 1.7;
    margin-bottom: 20px;
    text-align: center;
  }

  .cvContainer {
    max-width: 457px;
    margin: auto;
  }

  .mainContents {
    line-height: 1.7;
    margin-bottom: 40px;
  }

  .buttonWrapper {
    text-align: center;
  }

  .button {
    display: inline-block;
    border: none;
    border-radius: 5px;
    background: linear-gradient(to right bottom, #5630af, #3067af);
    color: #fff;
    text-align: center;
    font-size: 24px;
    font-weight: bold;
    padding: 16px 72px;
    cursor: pointer;

    &:hover {
      background: linear-gradient(to right bottom, #46209f, #20579f);
    }
  }

  .background {
    background-color: #eee;
    border-radius: 5px;
    padding: 20px 35px 30px;
  }

  .subTitle {
    font-size: 16px;
    font-weight: bold;
    text-align: center;
    margin-bottom: 10px;
  }

  .bottom {
    display: grid;
    grid-template-columns: repeat(2, 1fr);
    grid-template-rows: auto;
    grid-gap: 5%;
  }

  .buttonSmall {
    display: block;
    line-height: 1;
    border-radius: 5px;
    background: linear-gradient(to right bottom, #5630af, #3067af);
    color: #fff;
    text-align: center;
    font-size: 18px;
    padding: 16px;
    font-weight: bold;
    cursor: pointer;
    margin-top: 20px;

    &:hover {
      background: linear-gradient(to right bottom, #46209f, #20579f);
    }
  }

  .iconList {
    display: flex;
    justify-content: center;
    align-items: center;
    margin: 30px auto 0;
  }

  .listItem {
    img {
      max-width: 32px;
      max-height: 32px;
    }
  }

  .listItem + .listItem {
    margin-left: 45px;
  }

  /* thumbnail theme */
  .cvPoint--thumbnail {
    background-color: #eee;
    padding: 60px 40px;

    img {
      max-width: 100%;
      vertical-align: top;
    }

    .upper {
      margin-bottom: 40px;
    }

    .upperContents {
      padding: 0 20px;
      display: grid;
      grid-template-columns: 60% auto;
      align-items: center;
      grid-gap: 5%;
    }

    .cvBackground {
      background: inherit;
    }

    .background {
      background-color: #fff;
      padding: 25px 20px 30px;
    }

    .mainTitle {
      text-align: left;
      margin-bottom: 15px;
    }

    .mainText {
      margin-bottom: 0;
    }

    .buttonWrapper {
      margin-top: 30px;
    }
  }
}

@media (max-width: 820px) {
  .cvPoint {
    margin: 80px 0;
  }

  .cvBackground {
    padding: 40px 2em;
    background-image: url('/images/bg_microcms_screen_black.jpg');
    background-position: center center;
    background-repeat: no-repeat;
    background-size: cover;
    color: #fff;
    border-radius: 5px;
    margin-bottom: 20px;
  }

  .mainTitle {
    font-size: 18px;
    font-weight: bold;
    line-height: 1.7;
    margin-bottom: 10px;
  }

  .cvContainer {
    max-width: 457px;
    margin: auto;
  }

  .mainContents {
    line-height: 1.7;
    margin-bottom: 40px;
  }

  .buttonWrapper {
    text-align: center;
  }

  .button {
    display: block;
    border: none;
    border-radius: 5px;
    background: linear-gradient(to right bottom, #5630af, #3067af);
    color: #fff;
    text-align: center;
    font-size: 18px;
    font-weight: bold;
    line-height: 1;
    padding: 16px 1em;
    cursor: pointer;

    &:hover {
      background: linear-gradient(to right bottom, #46209f, #20579f);
    }
  }

  .background {
    background-color: #eee;
    border-radius: 5px;
    padding: 20px 35px 30px;
    margin-bottom: 20px;
  }

  .subTitle {
    font-size: 16px;
    font-weight: bold;
    text-align: center;
    margin-bottom: 10px;
  }

  .buttonSmall {
    display: block;
    line-height: 1;
    border-radius: 5px;
    background: linear-gradient(to right bottom, #5630af, #3067af);
    color: #fff;
    text-align: center;
    font-size: 18px;
    padding: 16px;
    font-weight: bold;
    cursor: pointer;
    margin-top: 20px;

    &:hover {
      background: linear-gradient(to right bottom, #46209f, #20579f);
    }
  }

  .iconList {
    display: flex;
    justify-content: center;
    align-items: center;
    margin: 30px auto 0;
  }

  .listItem {
    img {
      max-width: 32px;
      max-height: 32px;
    }
  }

  .listItem + .listItem {
    margin-left: 45px;
  }

  /* thumbnail theme */
  .cvPoint--thumbnail {
    background-color: #eee;
    padding: 40px 20px;

    img {
      max-width: 100%;
      vertical-align: top;
    }

    .upper {
      margin-bottom: 40px;
    }

    .cvBackground {
      background: inherit;
    }

    .thumbnail {
      margin-top: 20px;
    }

    .buttonWrapper {
      margin-top: 20px;
    }

    .button {
      padding: 20px 1em;
    }

    .background {
      background-color: #fff;
      padding: 25px 20px 30px;
    }

    .mainTitle {
      text-align: left;
      margin-bottom: 15px;
    }

    .mainText {
      margin-bottom: 0;
    }
  }
}
</style>
環境
本記事は下記のバージョンに基づき執筆しました。
- nuxt.js 2.15.4
終わりに
CVエリアの実装について紹介しました。
今回はthumbnailテーマのみ作成しましたが、カスタムフィールドをさらに追加してコード上で分岐することによって、複数のthemeを切り替えることができます。
今回実装した実際のコードはmicroCMS公式のGithubでも確認できますので、こちらもぜひ参考にしてみてください。
microcms-blog - github

